Getting Started with System Mechanic®
A step-by-step overview on how to use System Mechanic
 Over time and with regular use, PCs slowly degrade: slow performance, strange error messages, program lockups, crashes at the worst possible time—we’ve all experienced it. And this is why iolo created System Mechanic®—to fix the many, wide-ranging causes of these problems and prevent them from happening again in the future.
System Mechanic is able to provide this complete approach to PC care because it integrates multiple functions—50+ diagnostic, repair, and optimization features—into one easy-to-use interface.
More than 50 features sounds like a lot—and it is!—but System Mechanic is designed so that you can quickly get to the repairs and optimizations you need, skip those you don’t, and explore as much or as little about your PC as you’d like.
This quick 5-step tutorial introduces you to System Mechanic and helps you get started using the product: before you know it, you’ll be enjoying a faster, more efficient, and more reliable PC.
Step 1: Analyze Your PC
Your first step should be to run an analysis of your PC. When you first open System Mechanic, you’ll be on the Dashboard’s Overview pane.
Simply click Analyze Now and then view progress as System Mechanic analyzes your system and checks for problems.
When the analysis completes (typically, in less than 5 minutes), you’ll see a snapshot of your PC’s status—along with a graphic showing its health, security, and overall condition—and see the number of problems that System Mechanic detected.
Step 2: Repair Problems
Now that you’ve diagnosed your system, you can choose how you want to run any needed repairs:
- One click: To quickly make the needed fixes and optimizations, simply click Repair All. With this option, System Mechanic will automatically run repairs and optimizations using default settings. This is the fastest and easiest way to keep your PC in top condition.
- View details: To get more information prior to running any repairs, click View Problems. The Problems pane will display, showing you a list of all the issues detected on your PC along with descriptions of how a repair can help your computer. You can then decide which problems you want to fix. This option is ideal for the user who wants more control over repairs.
Step 3: Set Up Automated Monitoring and Repairs
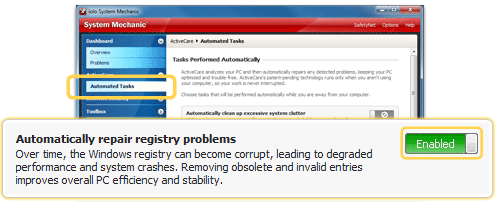
Patented ActiveCare® technology monitors your PC for potential problems and then automatically runs repairs when your computer needs them. This process keeps your PC healthy by immediately fixing issues before they cause serious damage. And best of all, ActiveCare runs silently in the background—only when your PC is powered on but you’re not using it—so it never interrupts you when you’re on the computer. Read more about how ActiveCare works.
You can pick and choose which automated repairs ActiveCare runs by making selections from the Automated Tasks pane. Go to ActiveCare > Automated Tasks and then simply click the toggle button next to a task to turn the automated fix on or off.
Note: ActiveCare is designed to never interfere with your computing work: if you return to your PC while ActiveCare is processing, you can either cancel the process or let it continue.
Step 4: Run Any Other Desired Tools
After running the recommended repairs and setting up automated tasks, you may want to explore more tweaks, fixes, and optimizations—if so, the Toolbox is the place for you.
The Toolbox has both All-in-one Tools and Individual Tools:
- All-in-one Tools combine the essential fixes into one simple wizard, each of which targets a certain problem area.Go to Toolbox > All-in-one Tools, and you can choose from the following: PC TotalCare®, PC Accelerator, PC Repair, PC Cleanup, PC Security, and Total Registry Revitalizer™. These all-in-one tools are a great solution for the busy user who wants to be up and running quickly.
- Each of the Individual Tools runs a repair, optimization, or diagnostic that is tailored to a specific need. The tools are grouped into function-based categories—this way, you can easily get to all the individual repairs and optimizations to address your need.Go to Toolbox > Individual Tools and explore the tools under each of these categories: Increase Performance, Enhance Protection, Clean Up System Clutter, Repair Problems, Ensure Personal Privacy, Manage System Configuration, and Perform Diagnostics.
The tools in System Mechanic use a “wizard” format, which means they guide you step-by-step with instructions on how to run the processes (and informative messages and graphics are provided throughout).
Step 5: Learn More
If you want to get more information about your PC or delve even deeper into System Mechanic, here are a few of System Mechanic’s other features you should consider exploring:
- Stay informed about the status of your all-important internet protection: go to Internet Security and then click Anti-malware or Firewall.
- Get IntelliStatus® data for advanced analysis and performance-tracking; these statistics show real-time information about the system components that most significantly impact PC performance: go to Reports > IntelliStatus.
- View detailed statistics of the repairs and optimizations made by System Mechanic: go to Reports > History.
- Tailor System Mechanic’s settings to suit your preferences and work style: from the menu bar, click Options.


