Knowing how to boot Windows 10 in safe mode is a necessity. When Windows® appears to be malfunctioning, you may need to use a diagnostic technique known as Safe Mode. Starting the computer up in Safe Mode can give a user different options to troubleshoot an issue, but getting there in the first place is not exactly straightforward. The good news is that the process has been simplified so that the majority of users can do it without any assistance whatsoever.
Three ways to start Windows in 10 in Safe Mode
A computer can be started in Safe Mode in three different ways with Windows 10. The first two options are a little simpler, as everything is visible on screen. If there is just a blank screen when the computer turns on initially, there is still a way to boot and enter Safe Mode, but it requires a little bit more patience and know-how. Follow our step by step guides to learn how to boot Windows 10 in Safe Mode.
Starting Windows 10 in Safe Mode from the Sign-In Screen
- Restart the computer the same as you would ordinarily.
- When the sign-in screen appears, click Power, and then the Restart button. Instead of a normal restart, hold down the Shift key to activate Safe Mode.
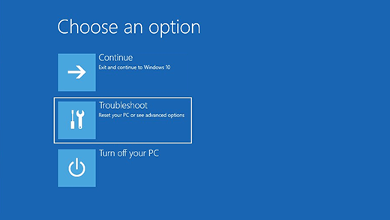
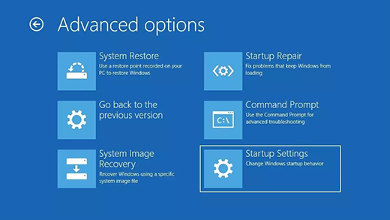
- The computer will act the same as a normal restart, but it will load with options on the screen instead. Once those options show up, click the second link that says Troubleshoot. From there, click on Advanced options, and then Start Up Settings before selecting Restart.

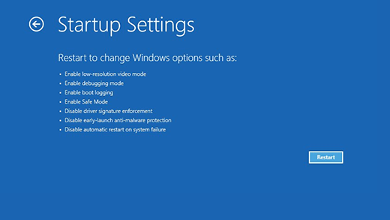
- This will activate another restart of the computer, and this time additional options are presented. Hold down F4 or 4 to boot in Safe Mode, or hold down F5 or 5 to boot in Safe Mode with Networking. The latter option is for those who need the internet once Windows boots.
Starting Windows 10 in Safe Mode from Settings
- Press the Windows Logo Key and l on the keyboard to open up Settings. Alternatively, you can select the Start Button, and then click Settings.
- Find the option that says Update and Security, and then click Recovery.
- From the options listed in Advanced Start Up, select Restart Now.
- Wait for the computer to restart. There will be an option screen that is listed upon restart. Select the Troubleshoot option, and then Advanced options, and then Start Up Settings, and then Restart. Some computers have extra security and require a BitLocker Recovery Key to be entered during this start up.
- Wait for the computer to restart again. Then select 4 or the option to start the computer in Safe Mode. If the internet is needed, select 5, or the Safe Mode with Networking option.
Starting Windows 10 in Safe Mode from a blank screen
- Initially turn off the computer by holding the Power button for at least 10 seconds.
- Once the computer is off, press the Power button again.
- Listen or watch for any sign that Windows is starting to load. Once that happens, hold down the Power button again for 10 seconds and turn the device off.
- Press the Power button once more and turn the device on again.
- Wait for Windows to restart, and then once again hold down the Power Button for 10 seconds and turn the computer off.
- Press the Power button and turn the computer on one more time.
- Wait for the device to start fully. It should enter what is known as winRE. This is the official solution to finally getting into Safe Mode. Select Troubleshoot, Advanced options, Start Up Settings, and then Restart.
- The computer should restart for the final time. This is when there will be the option to go into Safe Mode or Safe Mode with Networking.
When is the best time to start a computer in Safe Mode?
When figuring out what drivers or third-party software may be causing trouble
In Safe Mode, the majority of device drivers do not load. This means if the printer or scanner is causing an issue, it can be identified as such when the computer is in Safe Mode. The same goes for figuring out the issue with third-party software.
This could just be an issue of a new game or application recently causing problems. Removing the program and seeing if it makes any changes could save a lot of money and time.
System Restore
Your computer can seem to be working perfectly one day, but then becomes non-functional. If that is the case, going with a System Restore can allow you to go back to a point when the computer was functioning. From Safe Mode, you can step back in time to a system status when everything was stable. System Restore will show a few restore points, or system snapshots, you can select and go from there. It might be the fix that is needed if there is something new that is causing problems.
Identifying a corrupted registry
There are scenarios where a registry might seem completely corrupted, and a new installation of Windows is one of the only solutions. While it is frustrating to have to deal with something like that, having a computer in Safe Mode helps identify the problem. System Mechanic® has a feature that can also help identify and fix registry issues.
The history of Safe Mode and Windows
Safe Mode has been an option in Windows computers since the mid-1990s. It has always worked as a way to run a computer while also potentially having the ability to diagnose problems that are popping up. When in normal operating mode, a computer loads all software that is on the computer. In Safe Mode, computers ignore third-party programs, drivers, and other options that might potentially get in the way.
System Mechanic Special Offer
Smart recommendations deliver personalized tips to keep your PC optimized and protected. Speed up, secure, and simplify your digital life with System Mechanic©.
Free Download Now Faster processor & internet speed8x PC Mag winner
Computer still causing problems or too slow? How iolo System Mechanic can help
Going into Safe Mode and troubleshooting can help diagnose and repair some Windows problems, but a good PC cleanup utility will deliver lasting benefits by helping to keep your computer stable, clutter-free and supercharged before problems even occur. Award-winning System Mechanic is a great option for those who want to enjoy faster, more reliable computing on all the PCs in their home for one low price.
Our suite of tools can help speed up a computer, cutting down on future problems, enhancing safety, and making the overall user experience better. Give it a try for free, and help prolong your computer’s life and reduce technical headaches significantly.